Most foam finger orders that disappoint do not fail at the press. They fail on the artwork, days earlier, when a logo goes in as a low-resolution image, a font drops out because it was never outlined, or a design gets drawn to the edge of a die that trims part of it away. The print is only ever as good as the file you hand over. Spending twenty minutes setting the artwork up correctly is what separates a clean, on-brand run of a few hundred pieces from a reprint you pay for twice.
This is a step-by-step walkthrough of the specifications that matter, in the order you should decide them, so the foam finger you approve on screen is the one that ships.
Start with the die shape and finished size
The die shape defines your usable print area, so choose it before you design anything. A pointing-hand foam finger is not a rectangle, and the printable zone follows the outline of the hand, not the bounding box around it. Artwork drawn to the far edges of the shape risks landing on a curve or getting clipped where the die cuts. Keep type and critical logo elements inside a safe margin, roughly a quarter inch to half an inch in from the cut line, and treat the wrist or base panel as your most reliable flat area for text.
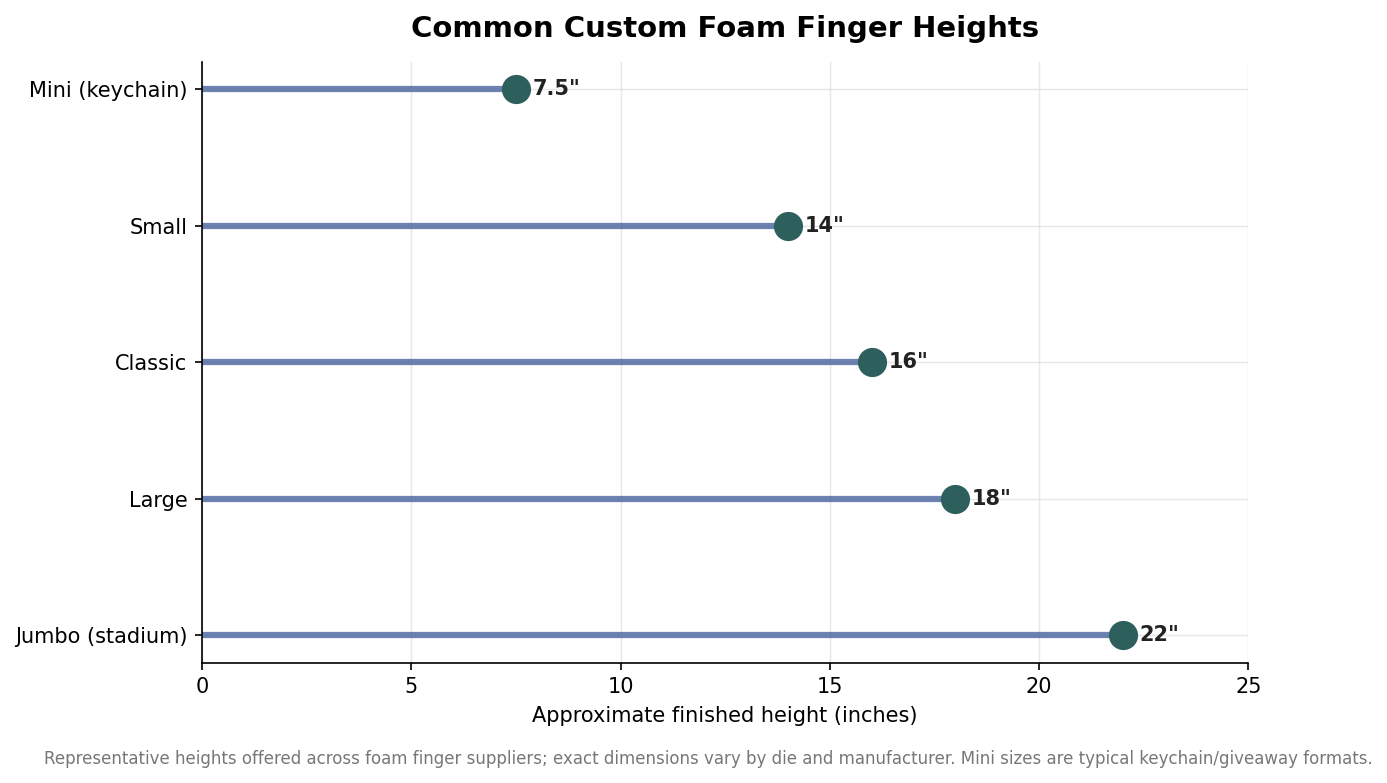
Size comes next because it sets how much detail actually reads. Foam fingers commonly run from about 7.5 inches for mini keychain and giveaway formats up to roughly 22 inches for the jumbo stadium size, with 14 to 18 inches covering most classic hands. A design that looks sharp at 18 inches can turn muddy at 7.5, so if you are ordering a mini alongside a full-size hand, simplify the small version rather than shrinking the same file.
Supply vector art and outline your fonts
Build the artwork in vector format. Suppliers typically want an SVG or a high-resolution vector PDF, and a raster fallback should be a PNG at 300 DPI at final print size, not a screenshot pulled off a website. Vector art scales from a mini to a jumbo without softening, which matters precisely because the same logo may run across several sizes.
The single most common file problem is fonts. Convert every piece of text to outlines or curves before you send the file, so the letterforms travel as shapes rather than depending on a font the printer may not have installed. If you skip this step, the shop either has to source your exact typeface or substitutes a different one, and a substituted font can quietly change your spacing and line breaks. Outlining also locks your kerning in place, which protects a wordmark from being reflowed. Send the fonts along too if the supplier asks, but outline first.
Spot color or full color: decide before you design
How your art is colored changes both the file you build and the price you pay. Spot-color printing reproduces a set number of solid, named colors, usually specified as Pantone (PMS) values, and it is the right choice for a clean logo made of a few flat colors. Because each color is a separate screen, cost tends to rise with the number of colors, and very fine gradients are not its strength. If you go this route, put the exact PMS numbers in your file or your notes rather than leaving the shop to guess from an RGB screen color, which will not match.
Full-color, or process, printing reproduces photographic images and complex gradients by building them from blended inks, and it is what you want for a detailed illustration, a photo, or a design with many colors. The trade-off is that flat brand colors can drift slightly from a Pantone target under process printing, so if an exact corporate color is non-negotiable, say so up front and expect the shop to steer you toward spot color for that element. Deciding this before you design saves you from building a gradient-heavy file for a two-color budget, or vice versa.
One printed side or two
Foam fingers can be printed on a single side or on both, and the two options are not the same order. Single-sided printing puts your design on the face that points at the camera or the jumbotron and leaves the back blank or in the stock foam color. Double-sided printing decorates both faces, which is worth it when the finger will be seen from behind as often as the front, such as a crowd shot where half the hands are turned away.
Double-sided work generally adds cost and can add a little to the lead time, because it is effectively two print setups on one piece. A frequent and cheap compromise is a full design on the front and a simple one-color logo or hashtag on the back. Decide this early, because it affects your artwork deliverables: a double-sided order needs two files, and the back design should be built to the same safe-margin rules as the front.
Foam, minimums, and the quantities behind your price
The physical build is worth understanding because it shapes both feel and cost. Foam fingers are typically die-cut from EVA foam around 2 to 3 millimeters thick per layer, giving a total product thickness in the range of 4 to 6 millimeters once the front and back are bonded. Thicker foam feels more substantial and holds its shape better in a waving crowd; thinner foam trims cost but can feel flimsy, so it is a spec worth confirming rather than assuming.
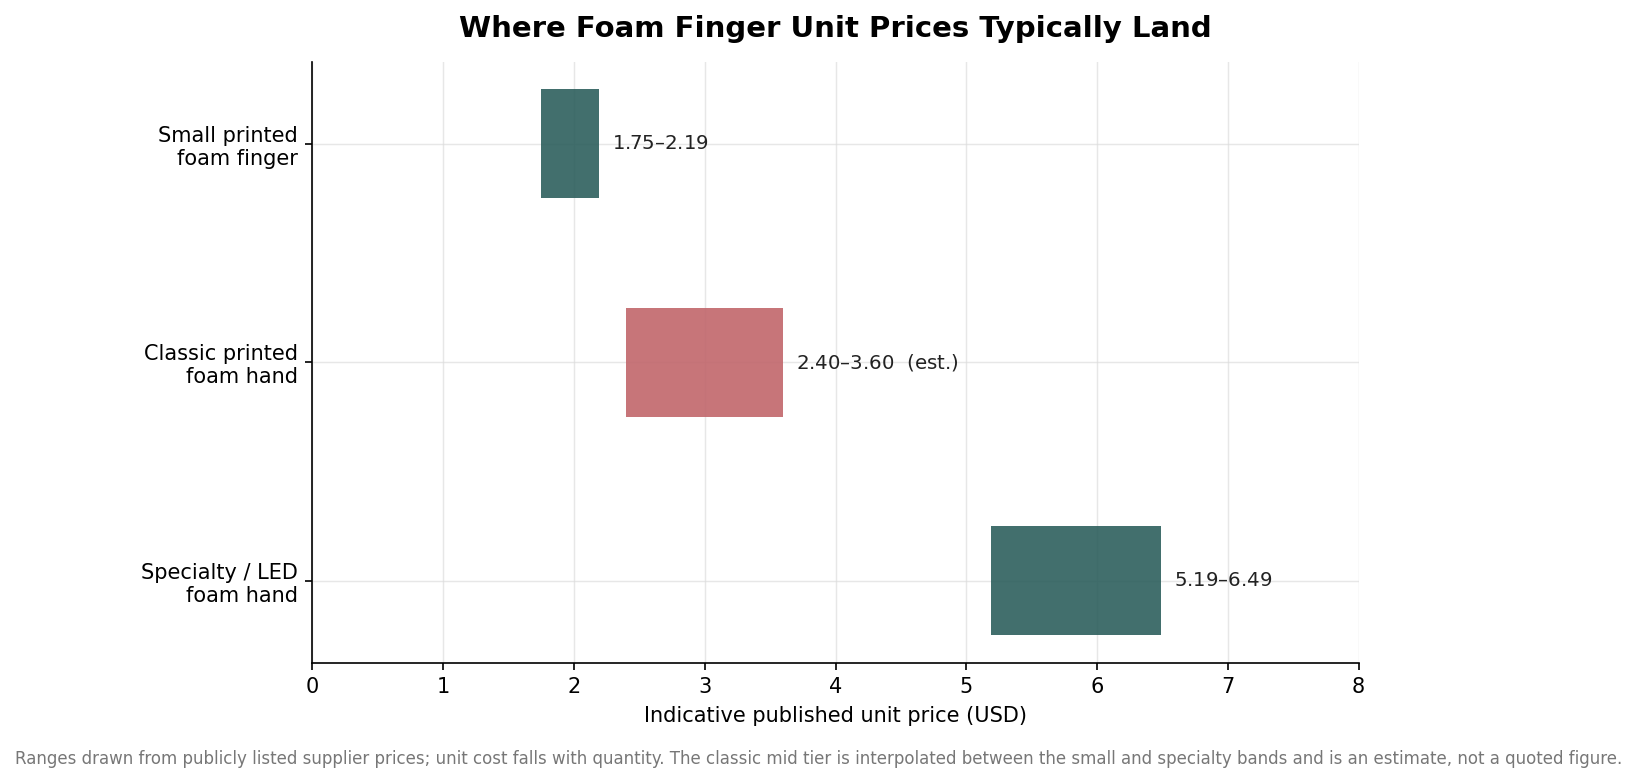
Quantity is where the economics live. Stock die shapes commonly carry minimums around 100 pieces, while a fully custom die-cut shape often starts near 500 pieces because the shop has to make tooling for your outline. Lead times run roughly 10 to 12 days after art approval for stock shapes and 16 days or more for custom dies, so back-plan from your event date and leave room for a proof. Unit prices published across suppliers land in the low single dollars for small printed fingers and climb toward five or six dollars for specialty and LED hands, with the exact figure falling as quantity rises; treat the ranges below as indicative rather than a quote.
Put together, the sequence is straightforward: pick the die and size, build clean vector art with outlined fonts, choose spot or full color to match your design and budget, decide one side or two, and confirm the foam thickness and quantity that set your price and timeline. Every one of these is a decision you make before anything is printed, which is exactly why they are the cheapest place to get a foam finger order right. Ask for a physical or digital proof before the full run, and check it against this list rather than against the version in your head.
Leave a Reply